7

How to Set Up a Smart Home Network with Edge AI : Step-by-Step Guide (Part 2)

Introduction

In Part 1, we set up a smart edge-powered monitoring system using Raspberry Pi and Pi-hole. Now, let’s take it a step further—by making your network intelligent and automated. Whether it’s blocking internet during bedtime or reacting to internet slowdowns, automation keeps your digital life efficient.

Tools You’ll Need

ComponentDetails
Raspberry Pi 4/3With Raspberry Pi OS Lite installed
Docker InstalledContainerized environment for Home Assistant
TP-Link Deco RouterWith local IP access
Telegram Bot (optional)For automation alerts
Home AssistantSelf-hosted automation hub

Step 1: Install Home Assistant via Docker

Run the following in your Raspberry Pi terminal:

docker run -d –name homeassistant \
–privileged \
–restart=unless-stopped \
-e TZ=Asia/Kolkata \
-v /home/pi/homeassistant:/config \
-p 8123:8123 \
ghcr.io/home-assistant/home-assistant:stable

This sets up Home Assistant in Docker, with data stored in /home/pi/homeassistant.

🔗 Access it via: http://<raspberry_pi_ip>:8123

Step 2: Add TP-Link Deco Router Integration

Inside Home Assistant:

  • Navigate to Settings → Devices & Services → Integrations
  • Search for TP-Link Kasa Smart
  • Add your router’s IP and credentials

✅ This allows Home Assistant to control your Deco mesh router (device block, restart, etc.).

Step 3: Automation – Block Internet at Night

Here’s how to block internet on a child’s device every night at midnight:

Meera: Block Mobile Internet at Night
trigger:
platform: time
at: “00:00:00”
condition: []
action:
service: tplink.set_device_state
data:
device_id: “”
enabled: false
mode: single

Replace <DEVICE_ID> with the actual device ID shown in the Deco integration.

Step 4: Automation – Speed Drop Alert

Automatically notify you if your download speed drops below 20 Mbps:

Meera: Alert on Speed Drop
trigger:
platform: numeric_state
entity_id: sensor.speedtest_download
below: 20
condition: []
action:
service: notify.telegram
data:
message: “Internet speed dropped below 20 Mbps!”
mode: single

Setup Tip: Use Speedtest CLI + sensor integration from Part 1 to track download speed.

Step 5: Visual Automations with Lovelace

Turn automation toggles into visual buttons:

Steps:

  • Go to Overview → Edit Dashboard
  • Add a new Entities Card
  • Include automation toggles like:
    • automation.block_mobile_internet_at_night
    • automation.alert_on_speed_drop

What’s Next?

Now your network isn’t just monitored—it acts on its own. In Part 3, we’ll explore AI integrations—using lightweight LLMs or TTS models to make your router or Raspberry Pi smarter with voice and intent recognition.

📦 Stay tuned for:

  • Edge LLM on Pi (like Whisper, Whisper.cpp)
  • Use cases like offline voice commands
  • YAML for AI triggers

TechieBano.Com | Smart Gear. Smarter Minds.

5A

How to Set Up a Smart Home Network with Edge AI : Step-by-Step Guide (Part 1)

Introduction

In today’s data-driven world, a basic router can’t keep up with modern demands. Buffering videos, inconsistent speed, and poor control over devices make traditional networks frustrating. That’s where Edge AI and DIY home networking step in.

In this blog series, we’ll build a smart, self-monitoring telecom setup using:

  • A Raspberry Pi
  • Edge AI tools
  • A TP-Link Smart Router
  • And simple scripting

This is Part 1: we’ll cover the setup and monitoring layer. No coding experience? No problem.


1. Tools You’ll Need

ComponentDescriptionBuy Link
Raspberry Pi 4 (2GB or 4GB)Small Linux computerBuy on Amazon
microSD Card (32GB)For OS & logsBuy on Amazon
TP-Link Deco / Archer RouterSmart Router with appBuy on Amazon
Internet ConnectionBroadband or Fiber
Laptop/PCFor SSH & configuration

2.Raspberry Pi Setup

Let’s start with the Pi.

  1. Flash Raspberry Pi OS Lite
  • Download Raspberry Pi Imager
  • Select: Raspberry Pi OS Lite (64-bit)
  • Flash to microSD using a card reader
  1. Enable SSH
  • After flashing, open the boot partition
  • Add a blank file named ssh (no extension)
  1. First Boot + Update

Insert SD card, power up, connect to the network.

Login via terminal or SSH:

ssh pi@<raspberry_pi_ip>

Note: #default password: raspberry

Update your Pi:

sudo apt update && sudo apt upgrade -y


3. Installing Pi-hole

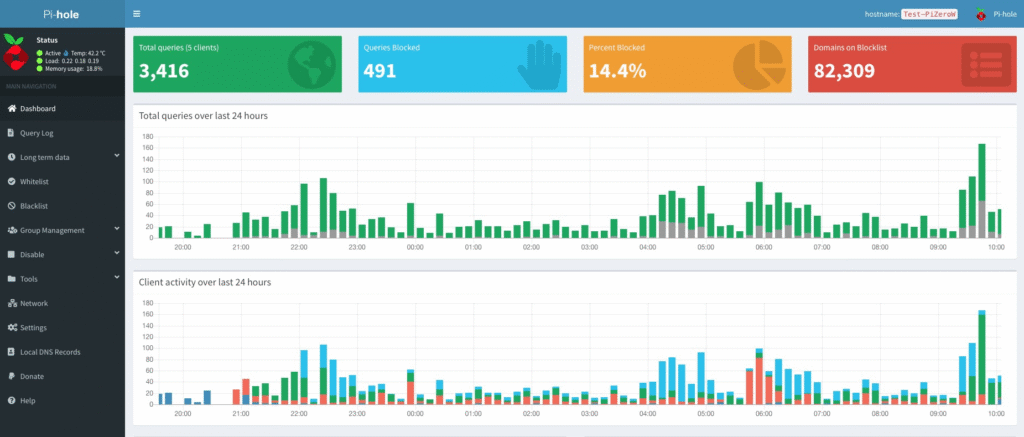
Let’s block ads and monitor DNS traffic locally.

Install Pi-hole

curl -sSL https://install.pi-hole.net | bash

Follow the prompts → Choose your network interface → Set a static IP.

Dashboard Setup

Once installed, access:


4.Speedtest Integration (Optional but Awesome)

Want to log your internet speed automatically?

Install CLI Tool

sudo apt install speedtest-cli

Add Cronjob for Auto Logging

crontab -e

Paste this at the end:

*/30 * * * * speedtest-cli >> /home/pi/speedlog.txt

Note: This logs speed every 30 minutes. Use it later for AI analysis in Part 3.


✅ Wrap-Up

You’ve now:

  • Set up your Raspberry Pi
  • Installed Pi-hole to block ads and monitor DNS traffic
  • Configured automatic internet speed logging

Up Next in Part 2:
We’ll add Home Assistant, automate bandwidth alerts, and create smart rules for your devices.


🛠️ TechieBano.Com | Smart Gear. Smarter Minds.
4

Deploying Edge AI at Home: What’s an On-Device LLM?


Why Edge AI Matters Now—Especially at Home

Let’s face it: smart homes shouldn’t rely entirely on cloud servers to turn on a fan or switch off a light. We live in a country where internet stability varies, and privacy is a growing concern. That’s where Edge AI becomes a game-changer—especially when powered by on-device Large Language Models (LLMs).

This isn’t just future talk. It’s real, it’s accessible, and it works today.


1. What Is Edge AI?

Edge AI means the intelligence runs on your own devices—not on some remote server.
It works on local processors like your laptop, router, or microcontroller and responds to real-world inputs like temperature, sound, or motion.

Why it’s a big deal:

  • Real-time speed – zero lag
  • Offline operation – perfect when internet drops
  • Privacy-first – no data leaves the premises
  • No cloud bills – use once, no subscription

2. What’s an On-Device LLM?

An On-Device LLM is a trimmed-down version of large AI models (like ChatGPT) that runs right inside your devices.
That means no external API calls. The entire interaction—voice, text, automation—happens locally.

Some practical models:

  • Phi-2 – small, multilingual, works well on laptops
  • Mistral 7B – more powerful, great for desktops
  • TinyLLaMA – perfect for Raspberry Pi or ESP32 boards

These models can help us build smarter routines at home using natural language. They even understand Hinglish or local dialects when finetuned.


3. Why This Is Ideal for Indian Homes?

Let’s break it down from an Indian perspective:

  • Internet isn’t always reliable—especially in Tier-2/Tier-3 cities.
  • Privacy matters—no more uploading voice data to unknown servers.
  • Regional support—train models in Marathi, Hindi, or Tamil.
  • Zero recurring cost—no tokens, no APIs, no renewals.

Edge AI at home means true independence from cloud limitations.


4. What Tools & Hardware We Can Use?

Here’s a practical starter toolkit:

Tools:

ToolPurpose
LM StudioGUI for running models locally
OllamaCLI to manage on-device models
Home AssistantSmart home control hub
OpenWRTAI-capable custom router firmware

Recommended Hardware:

  • 💻 Laptops (i5/i7 with 8–16GB RAM)
  • 🍓 Raspberry Pi 5 or Jetson Nano
  • 📱 Android phones with high-end Snapdragon chips

Real-World Use Cases for Indian Homes

ApplianceSmart Edge-AI Feature
FanAuto-adjust speed based on room temperature + presence
LightSwitch on when room gets dark or senses motion
TVAutomatically mute on incoming calls
RouterAlert when new/unknown devices connect

And yes, all of this can be done offline, without cloud sync.


Things to Keep in Mind

IssueHow to Fix
High memory usageUse quantized .gguf models (Q4_0 or Q5)
Model slow to respondUpgrade SSD or RAM; reduce model size
Language issuesTrain LoRA adapters for dialects
Compatibility problemsStick to formats like .gguf, .onnx

Beginner Tips to Get Started

  • Start simple: Try automating just one light or fan.
  • Use LM Studio to test LLMs without writing code.
  • Use Node-RED or Home Assistant for visual workflows.
  • Look for community projects on GitHub or Reddit (r/LocalLLaMA).

Edge AI is no longer reserved for research labs or big tech companies. It’s available to us—engineers, makers, and homeowners—who want local control and smarter environments without giving away our data or relying on cloud infrastructure.

For Indian homes, it’s more than just automation—it’s personal, secure, and offline intelligence built on our terms.